Friday, February 28, 2014

Growing Carrots in a Bucket

Growing carrots is easy and fun, given the correct soil and seed spacing. Soil must be loose with no obstructions such as hard clay, limestone, or rocks. One of the easiest methods we have used is planting carrot seeds in a bucket. 
The bucket will need to have a drain hole in the bottom.  Fill the planting bucket with potting soil or compost. Push the soil to the sides of the bucket to make a space in the center column. This is filled with organic fertilizer or worm castings. Add composted soil on top of the fertilizer/worm castings and water well. 

Seeds should be placed in top of the soil 3" apart (only a single seed per spot), about 2" from the sides of the bucket. Sprinkle a very small amount of loose soil over the seeds and water with a fine mist. Do not allow soil to dry out. 


Carrots are ready in about 2 months. You can see the tops of the carrots peaking up through the soil when they are ready to pull.


We find Valery variety of carrots to be excellent growers and full flavored. Excellent for roasting! Short 'n Sweet variety is great for eating raw and is less tapered.

Wednesday, February 26, 2014

How To: Freeze Passion Fruit

Passion Fruit pulp freezes nicely. 


Scoop the pulp/seeds into a blender...


Blend the pulp for 15 seconds...then strain out the seeds.  


Pour strained pulp into ice cube trays and freeze. 


 Once frozen, pop out and store the passion fruit cubes in an airtight container or ziplock bag. 


The fruit shells should go into the compost...


We are using an old stainless steel washing machine drum, buried in the ground for a compost bin. 

Monday, February 24, 2014

What is growing in February - Harvest Face

Our Florida gardens have continued to provide us with plenty of fresh foods this February.

Lemon Queen Sunflowers (picked early as flowers to enjoy)
Valery Carrots
Short 'n Sweet Carrots
Broccoli
Heirloom tomatoes
Ecuadorian Cilantro
Bell Peppers, 
Sweet Peas
and more Passion Fruit

Thursday, February 20, 2014

Dried Star Fruit - An Excellent Snack

Generally, I prefer fresh fruit to dried fruit. However, the starfruit is an exception. Starfruit takes on a wonderful flavor and texture when dried. 


Any time you are using starfruit, you should cut off the rips and ends. 


To prepare for drying, cut starfruit into 1/4-1/2" sections.


Place the slices on the dehydrator trays and set the temperature to 135 degrees. Any thinner pieces will dry faster (about 8 hours), while thicker pieces may take up to 12 hours. Store cooled fruit in a sealed container in the refrigerator. These make a tasty snack to bring along when out and about.

We recently purchased an Excalibur dehydrator. We are very pleased with it and find it far superior to the round dehydrators we were accustomed to using. It is a good investment if you plan on drying fruits/flowers/herbs from your yard. We have been making fresh herbal teas and drying fruits ~ all using items grown in our backyard. These starfruit, were a gift from a friend's backyard tree.


Starfruit makes an excellent dried snack! 


Note: Starfruit should not be eaten by people with kidney disease

Saturday, February 15, 2014

Passion Fruit Ice Cream

If you are looking for a prolific fruit plant to grow in the southern half of Florida, Passion Fruit is very rewarding. This is what we gathered over the past two days. It is important to check under the vine once or twice a day as passion fruit should not be picked, but rather fallen fruit should be gathered to ensure ripeness. The variety of passion fruit that we sell bares fruit year round. Mid- February, we gather over 25 fruits per day. 


Passion fruit can be stored in the refrigerator for up to a week. 

For extended storage, the pulp can be scooped out and frozen in containers or ice cube trays. 

8 medium sized fruits will yield about a cup of pulp without seeds. 


To separate the seeds from the pulp, simply blend the pulp (with seeds) for a 15 seconds. Use a mesh strainer to strain out the seeds. Use the back of a spoon to press the pulp through. You can add a small amount of water to get the last bits of pulp through the strainer. The pulp can be used to make many things - syrup, jelly, ice cream, and more.

Passion Fruit Ice Cream  - eggless!

2 1/2 c. milk
1 c. passion fruit pulp (without seeds)
1 c. heavy cream
1 c. sugar

In a bowl, whisk ingredients together and then chill in the freezer for 30 minutes. Place ingredients in ice cream maker or stir every 30 minutes in the freezer. Store extra ice cream in airtight container in the freezer.


Friday, February 14, 2014

Growing Sweet Potatoes

Growing sweet potatoes in Florida is very simple and rewarding. 

Start with one organically grown sweet potato.  Cut the sweet potato in half and place each half upright in a clay saucer filled halfway with wet soil. This method is superior to using water alone.

 Keep the soil very wet and eventually, you should begin to see leaves and roots forming. It can take several weeks for sufficient roots to form. 

Break or cut off sections that have both roots and leaves. These are then planted outdoors. 


The sweet potato "slips" can be planted in an area of the yard, or in a large pot. I grow them in pots in control their growth as they can spread quite a bit when planted in the ground. 

Adding compost or worm castings to your soil will help in producing large sweet potatoes. 

After six months, check the top of the soil by gently moving some aside with your hands. For our first harvest, we could see the potatoes peeking out of the top of the soil. We only pull out what we will eat that month. After we pull out the sweet potatoes, we brush them off with a dry towel and allow them to sit out on the counter for a few days before eating. 


We leave behind the small sweet potatoes in the pot and harvest them at least 3 months later.


Sweet Potato Casserole

Sweet Potatoes
3 c. sweet potatoes
1/2 c. sugar
2 eggs (beaten)
1/2 c. milk
1/2 tsp. salt
1 tsp. vanilla

Boil sweet potatoes in water until tender. Allow to cool and then remove skin easily by hand. Mash sweet potatoes. Mix all ingredients together and pour into a 9" square or round baking dish.

Topping
1 c. brown sugar
1/2 c. butter
1/2 c. flour
1 c. pecans (optional)

Cut sugar into butter. Gradually add in flour and mix with hands. Do not over mix. Mix in the pecans. Sprinkle topping over sweet potato mixture. Cook at 350 degrees for 1 hour.


Tuesday, February 11, 2014

Yuca ~ Cassava Preparation

While living in Ecuador, it was common to see a Yuca plants around each house and in the tuberous root available in markets. Restaurants that served hamburgers would often offer a choice between yuca fries and potato fries. The flour (tapioca flour) is also used to make wonderful doughs. Yuca is high in carbohydrates but low in protein. It also contains calcium, phosphorus, and vitamin C. 


Proper preparation is essential because the plant contains two cyanogenic glucosides. 

After digging up the roots, peel the exterior off using a knife or very sharp/sturdy peeler. 


Cut the root in half lengthwise, then in half again, making long quarters. This will help with removing the fibrous center (as seen in the middle of the root above).

Cut into strips and soak in water in the refrigerator for a few hours.


Drain, and boil until you can pierce the pieces easily with a fork....about 45 minutes


Now, the Yuca can be prepared as desired or stored in the refrigerator for a few days until ready to prepare or frozen.


Yuca Fries

For Yuca fries, heat 2 quarts of oil to 375 degrees and fry Yuca fries until crispy and golden brown...about 5 minutes. Remove fries and place on a paper towel lined plate before eating. You can also make cassava chips by cutting the yuca into thin slices before frying.

Pan de Yuca

1 c. yuca flour (tapioca flour, alimidon de yuca)
5 tsp. oil
1/3-1/2 c. milk
4 tsp. baking powder
2 c. fresh cheese (queso fresco) can substitute with mozzarella

Preheat oven to 400 degrees. Kneed all ingredients for 3 minutes. Start with 1/3 cup of milk and only add more if necessary. If too much is added, you will not be able to roll the dough into balls. Form small golf ball sized balls and place on baking sheet with silpat or parchment paper. Bake at 400 degrees for 15-20 minutes or until lightly golden brown.

Sunday, February 9, 2014

Choco Bananas -Namwah Bananas

One of our favorite varieties of bananas are Namwah bananas. These plants produce very quickly. The bunches contain a great number of small bananas. You can cut off a hand at a time and allow it to ripen inside to avoid having too many ripe all at once.


However, should you have too many ripen at the same time, chocolate covered, frozen bananas are a great treat to make with the excess.

Choco Bananas

Simply peel the bananas and insert a popsicle stick or chopstick into one end - pushing it almost all the way through. In a double boiler, heat chocolate chips or melting chocolate wafers, stirring often. Dip the bananas into the chocolate and use a spoon if necessary to completely cover the banana with chocolate. You can cover with chopped peanuts or sprinkles. Place covered bananas on a parchment lined cookie sheet. Once the cookie sheet is full, place in the freezer. After 8 hours, you can place the frozen bananas into a bag.


Friday, February 7, 2014

Harvest Face


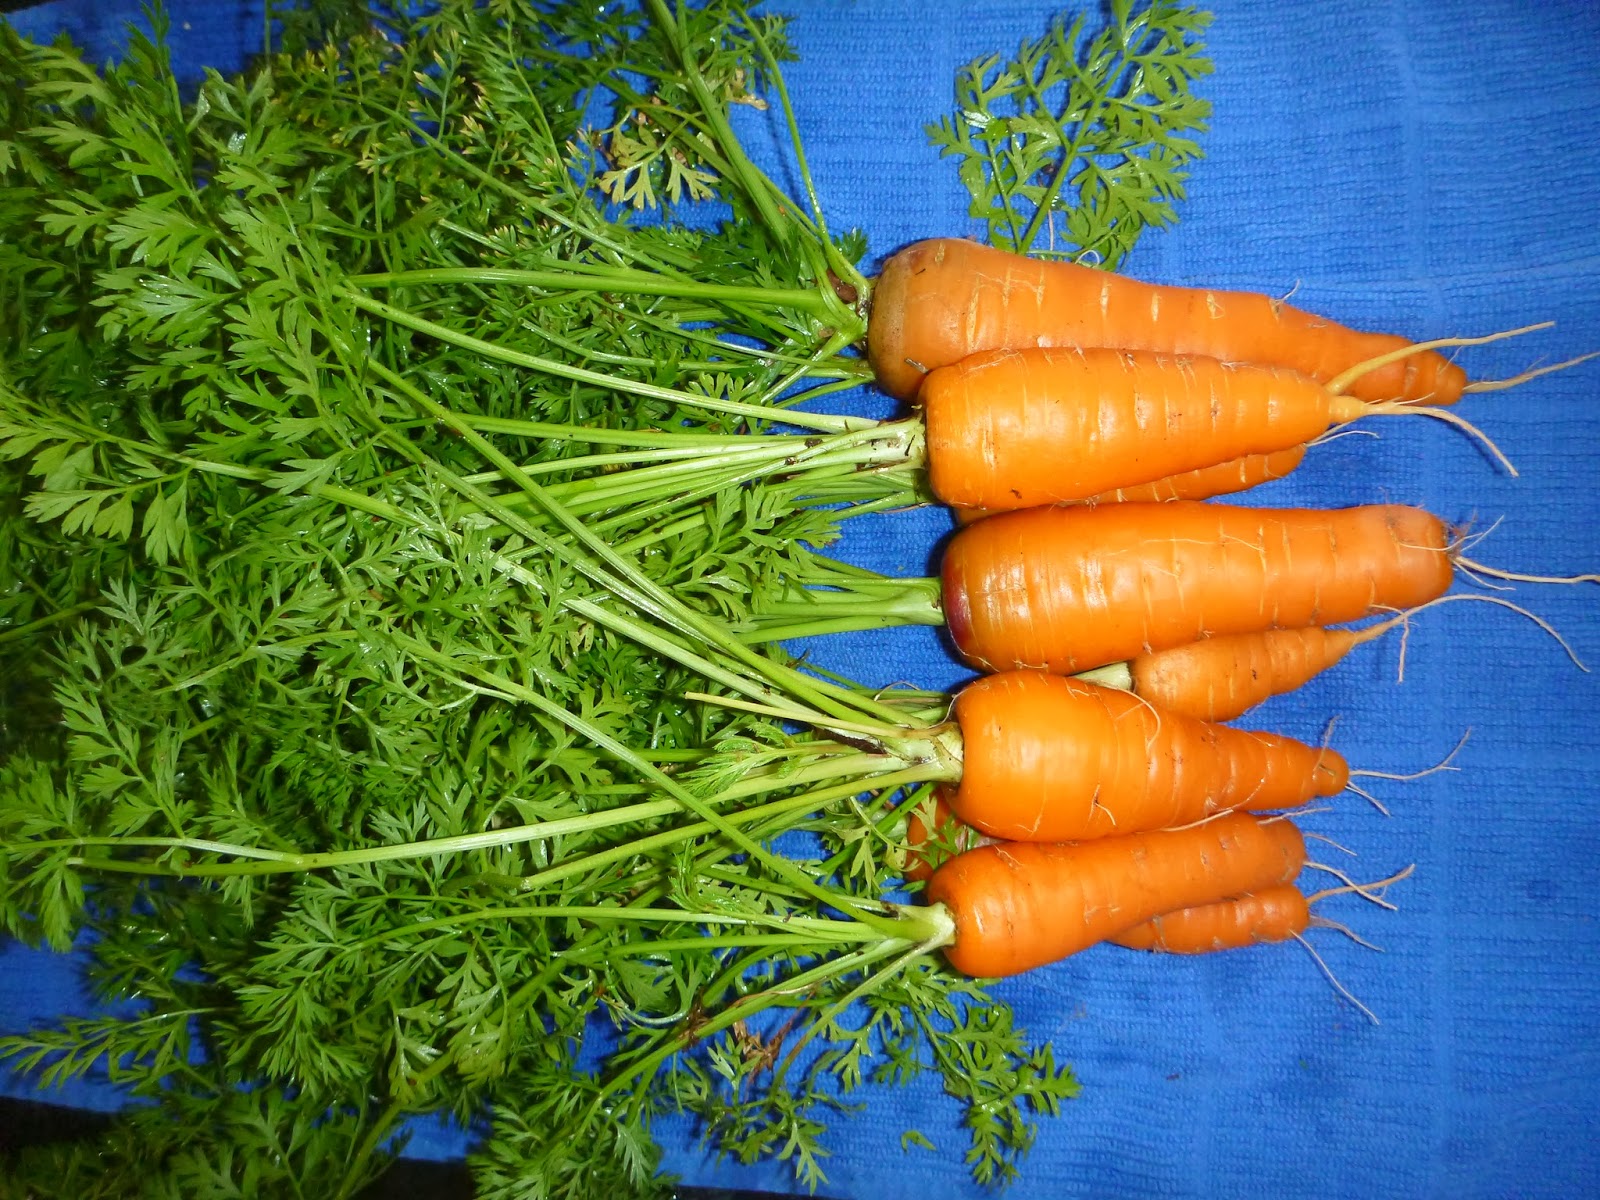
We thinned our carrots this week. We are currently growing three varieties of carrots. The most flavorful are St Valery (the largest carrot in the top center of our harvest face). Carrots are best when planted in well loosened soil with only one seed planted per 3". I had some young helpers around planting time, so this necessitated thinning of the carrots as they are growing. The thinned carrots are the perfect size for snacking. To pick the carrots, gently move the dirt away from the base of the green leafy top, grasp ahold of the top of the orange carrot and wiggle and gently lift out of the soil. Carrots should then be washed and brushed with a vegetable brush. Cut off the green tops before storing in the refrigerator. The green tops can be fed to rabbits, tortoises, or added to the compost. The leafy tips can also be added to salads if desired.

St Valery carrots are sweet and crisp ~ excellent cooked or eaten raw. 


Tuesday, February 4, 2014

Volquetero Recipe

This dish is common in Puyo Ecuador. Volquetero is literally translated as Dumptrucker. Essentially, it is a plate full of Ecuadorian bus/street food. It is a fun recipe that uses plantains. 

volquetero recipe - Ecuadorian street food Puyo Ecuador

Plantain - sliced and fried in oil 
Chochos (Lupine beans - available in latino/italian grocery sections in glass jar) 
Chulpe (popped Maize Chulpe - available at latino markets)
Tomato - 1/2 chopped
Red Onion - 2 T
Lemon - juice from one small
Cilantro - 1 T fresh
Tuna - 1 can
Salt
Oil
  1. Chop or finely slice onion and soak in water with 1tsp salt. 
  2. Chop tomato and cucumber if desired.
  3. Strain onion and combine with tomato, cucumber, and cilantro in a bowl and squeeze lemon over all. 
  4. Heat 2 T oil in pan, add corn, place lid and shake over medium heat until kernels pop. The corn will appear larger, but not like the popcorn we are accustomed to as this corn pops inside. Strain on paper towel and lightly salt
  5. Thinly slice plantains. Heat oil deep enough to cover plantain slices. Once oil is 350 degrees, add plantain slices and fry until lightly brown. Remove with wire spoon and strain on paper towel and lightly salt. 
  6. Remove skins from Lupine beans by pinching. Rinse beans.
  7. Drain can of tuna
  8. Assemble the dish with plantain chips, corn, and beans topped with tuna and topped again with tomato, onion, cucumber. Add more lemon juice/salt if desired. 
Enjoy with a glass of passion fruit juice!


920x60-2

Linkwithin

Related Posts with Thumbnails